آموزش ایجاده عکس های خیره کننده از غروب خورشید
سپتامبر 25, 2019
3085
بدون دیدگاه


You must need to login..!
تنظیمات دوربین
یک مورد که اغلب از من سؤال می شود این است که “برای تنظیم عکس از غروب خورشید باید از چه تنظیماتی استفاده کنم؟” عکاسی در غروب خورشید هیچ تفاوتی با عکسبرداری از هر منظره دیگر ندارد. بنابراین موارد زیر یک نقطه شروع خوب است:
حالت عکسبرداری: دستی
ISO: 100
دیافراگم: f / 11 (حداکثر عمق میدان ، بدون به خطر انداختن کیفیت تصویر)
سرعت شاتر: تنظیم کنید تا جزئیات در قسمت هایلایت های آسمان حفظ شود (اگر خیلی روشن است ، آن را سریع تر ، اگر خیلی تاریک کنید ، آن را کندتر کنید)
تراز سفیدی: نور روز / آفتابی (در صورت عکسبرداری در JPEG)
با این حال تنظیمات دوربین به تنهایی موفقیت را تضمین نمی کند ، چند نکته دیگر نیز باید در نظر بگیرید.
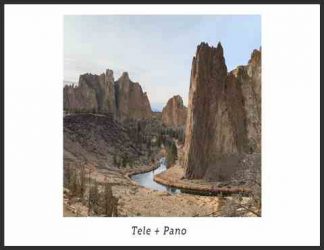
غروب خورشید با پشت سر هم ستاره
هنگامی که خورشید از خط درخت عبور کرد ، به خورشید شلیک کنید (ISO 200 ، f / 11 ، 30s ، با استفاده از فیلتر ND فارغ التحصیل 3 مرحله ای ، فیلتر ND 10 مرحله ای)
قرار گرفتن در معرض بیماری
غالباً نقاشی یک غروب آفتابی با رنگ روشن است که شامل قرمز ، میناکاری و پرتقال است و وسوسه می تواند این باشد که آسمان نقطه کانونی تصویر باشد ، برای آن در معرض دید قرار بگیرد و همه چیز را به سمت siluet می اندازد. اگر یک افق جالب وجود دارد ، می تواند به صورت ترکیبی کار کند اما اگر نباشد ، تصویری باقی می ماند که می تواند بیننده را به سرعت از دست بدهد – پس از آسمان ، جایی برای چشم باقی نمی ماند.
همچنین یکی از شادی های غروب خورشید گرفتن نور طلایی است که جهان را جلوی شما روشن می کند و سایه های طولانی را ریخته است. بنابراین ، گرفتن هر دو زمین و آسمان به درستی در معرض می تواند تصاویری با تأثیر بسیار بیشتری تولید کند که توجه بینندگان را برای مدت بیشتری جلب کند. با این حال ، یکی از چالش های موجود در آن نهفته است.
هنگامی که خورشید کم است ، آسمان در مقایسه با زمین بسیار روشن ظاهر می شود. با توجه به محدوده دینامیکی محدود سنسورهای دیجیتال ، تفاوت درخشندگی بین آسمان و زمین می تواند برای تصویر حاصل مشکل ایجاد کند – اگر تفاوت خیلی زیاد باشد ، شما یا در قسمت هایلایت (آسمان) یا سایه ها (زمین) جزئیات را از دست می دهید. )
برای غلبه بر این دو راه وجود دارد:
برای سلطنت در آسمان روشن از فیلترهای تراکم خنثی فارغ التحصیل (همانطور که در این پست پوشیده شده است) استفاده کنید و اطمینان حاصل کنید که می توانید طیف گسترده ای از برجسته ها و سایه ها را در یک تصویر ضبط کنید.
چندین عکس بگیرید (یکی در معرض آسمان ، یکی در معرض حداقل برای زمین) و این دو را با استفاده از نرم افزار ویرایش عکس مخلوط کنید.
هر دو روش با عوارض همراه هستند (پتانسیل شعله ور شدن ناخواسته یا ریختن رنگ از فیلترها یا حرکت ناخواسته بین مواجهه برای مخلوط شدن). ترجیح من استفاده از فیلترهای تراکم خنثی فارغ التحصیل ، با هدف گرفتن هرچه بیشتر دوربین مناسب در یک تصویر است ، برای صرفه جویی در وقت تلف کردن در معرض نور هنگام بازگشت به رایانه ، صرفه جویی می کنم.
ترکیب بندی
هنگام عکسبرداری از یک خورشید غروب ، وسوسه این است که همیشه خورشید را در قاب قرار دهید. اگر خورشید هنوز در آسمان معقول است ، این چالش برانگیزترین تصویر برای در معرض قرار گرفتن صحیح است. اما اگر صبر کنید تا خورشید تازه از افق فرو رود ، متوجه می شوید که قرار گرفتن در معرض نور بسیار ساده تر است و به محض حفظ برجسته های برجسته ، می توانید خورشید را با “ستاره خورشید” شعله ور کنید. با اضافه کردن یک نقطه کانونی اضافی به تصویر خود.
گزینه دیگر دور کردن از خورشید و گرفتن نور کم به دلیل ترسیم منظره است. شما ممکن است “نمایشی” از خود خورشید را ضبط نکنید ، اما شما هنوز هم احساس آن زمان از روز را خواهید گرفت ، بدون آنکه مشکلی در معرض آفتاب درخشان داشته باشید.
Camera Settings
One thing I am often asked is “what settings should I use to photograph a sunset?”. Photographing at sunset is no different to shooting any other landscape; therefore the following make a good starting point:
Shooting mode: Manual
ISO: 100
Aperture: f/11 (maximising depth of field, without compromising image quality)
Shutter speed: Adjust so that detail is retained in the sky highlights (if too bright, make it faster, if too dark, make it slower)
White balance: Daylight/Sunny (if shooting in JPEG)
However camera settings alone do not guarantee success, there are a few other things to consider.
Sunset with star burst
Shot into the sun as the sun crossed the tree line (ISO 200, f/11, 30s, using 3-stop graduated ND filter, 10-stop ND filter)
Exposure
Often, the draw of a sunset is a brightly coloured sky containing reds, pinks and oranges and the temptation can be to make the sky the focal point of the image, expose for it, and throw everything else into silhouette. If there is an interesting skyline, this can work compositionally however if not, you will be left with an image that can lose the viewers interest quickly – after the sky, there is nowhere left for the eye to go.
Also, one of the joys of sunset is capturing the golden light illuminating the world in front of you and casting long shadows. Therefore, capturing both the land and sky correctly exposed can produce images with a much higher impact that will hold the viewers attention for longer. However, therein lies one of the challenges.
When the sun is low, the sky will appear very bright in comparison to the land. Due to the limited dynamic range of digital sensors, the difference in brightness between the sky and the land can cause problems for the resulting image – if the difference is too great, you will either lose detail in the highlights (sky) or shadows (land).
There are two ways to overcome this:
Use graduated neutral density filters (as covered in this post) to reign in the bright sky, and ensure that you can record the full range of highlights and shadows in one image
Take multiple images (one exposed for the sky, one exposed for the land as a minimum) and blend the two together using photo editing software.
Both approaches come with complications (the potential for unwanted flare or colour casts from filters, or unwanted movement between exposures for the blending). My preference is to use graduated neutral density filters, with the aim of getting as much right in-camera in one image, to save having to spend time blending exposures when back at my computer.
Composition
When shooting a setting sun, the temptation is to always include the sun in the frame. If the sun is still reasonably high in the sky, this will be the most challenging image to expose correctly. However if you wait until the sun is just dropping over the horizon, you will find that the exposure is much easier to maintain and, once you can retain the bright highlights, you will find the sun is captured with a ‘sun star’ of flare, adding an extra focal point to your image.
The other option is to turn away from the sun, and capture the low light as it sculpts the landscape. You may not capture the ‘drama’ of the sun itself, but you will still capture the feeling of that time of day, without having the difficulties of exposing for the bright sun.
10 تکنیک مهم عکاسی با موبایل برای افراد مبتدی برای دانلود رایگان 10 تکنیک مهم عکاسی با موبایل برای افراد مبتدی با کیفیت 1080p از پلیر سایت یا لینک ز�
عکاسی حرفه ای با گوشی xiaomi redmi note 8 pro برای دانلود رایگان عکاسی حرفه ای با گوشی xiaomi redmi note 8 pro با کیفیت 1080p از پلیر سایت یا لینک زیر استفاده کنین لینک
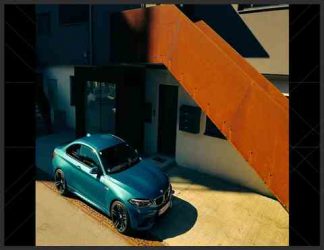
آموزش چگونگی عکاسی از ماشین با گوشی هوشمند برای دانلود رایگان آموزش چگونگی عکاسی از ماشین با گوشی هوشمند با کیفیت 1080p از پلیر سایت یا لینک زیر ا
آموزش ایجاد افکت نوارهای VHS رو ویدیو در Premiere برای دانلود آموزش ایجاد افکت نوارهای VHS رو ویدیو در Premiere با کیفیت full hd 1080p از پلیر سایت یا لینک زیر
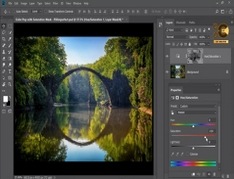
طریقه کار کردن با Mask و Saturation در photoshop(فتوشاپ) برای دانلود آموزش طریقه کار کردن با Mask و Saturation در photoshop(فتوشاپ) با کیفیت full hd 1080p از لینک زیر یا پلیر س
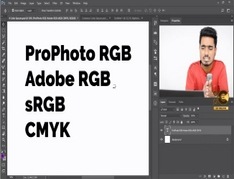
توضیحاتی درباره سیستم رنگی RGB , sRGB , CMYK و… برای دانلود آموزش توضیحاتی درباره سیستم رنگی RGB , sRGB , CMYK و… با کیفیت full hd 1080p از لینک زیر یا پلیر سایت اس�